![]()
Minimum System Requirements Back
The minimum system requirements for using the Your Company Name FTP Applet are as follows:
Secure FTP Applet has the following minimum system requirements:
· Operating Systems: Windows 98/2000/XP/ME, Linux, Solaris, Mac OS X
· Browser: Internet Explorer or Netscape Navigator
· Browser Java VM: Java-Plugin 1.4.2 or above enabled
To download the latest copy of Internet Explorer or Netscape, please use one of the following links:
Internet Explorer: http://www.microsoft.com/windows/ie/default.asp
Netscape: http://channels.netscape.com/ns/browsers/default.jsp
To download the latest Java Plug-in, please go to http://java.sun.com/getjava/
User Interface Back
Below is a screenshot of the FTP Applet user interface. Your display may vary slightly based on your operating system and browser used. A description of each component is provided below.
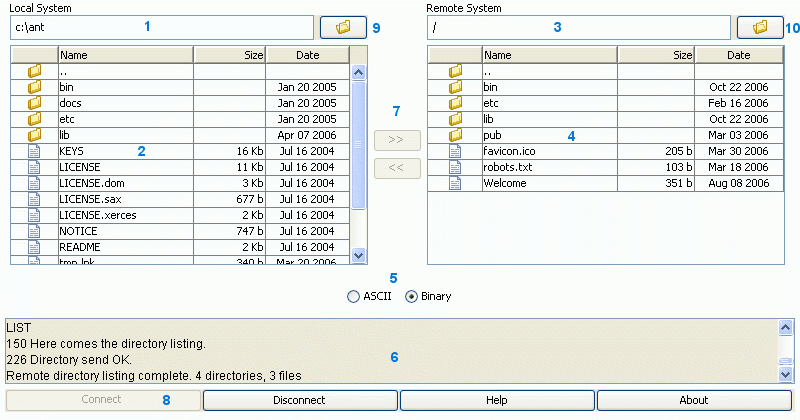
Note: The term "Local" refers to your computer and "Remote" refers to the FTP server.
1. Current local directory - Displays the full path of your
current local directory.
2. Local directory - Displays files and child folders in your
current local directory.
3. Current remote directory - Displays the path of your current
remote directory.
4. Remote directory - Displays files and child folders in your
current remote directory.
5. Transfer mode - Switch between ASCII and Binary transfer
modes
6. Message window - Displays messages sent to and received from
the FTP server.
7. Upload / Download - Buttons for uploading and downloading
files.
8. General commands - Buttons for connecting to FTP server,
disconnecting from FTP server and accessing help and information about the
applet.
9. Local drives - Displays local drive listing.
10. Remote directory history - History of directories accessed
on remote system.
Connecting to the FTP server Back
When you browse to the logon page, a dialog will be presented similar to the one shown below asking you to confirm that you trust the certificate used to sign the applet. The FTP Applet requires access to local resources. You must accept this dialog for the applet to continue loading. To avoid this dialog from being displayed each time you connect click on the "Always trust content from JSCAPE L.L.C." checkbox.
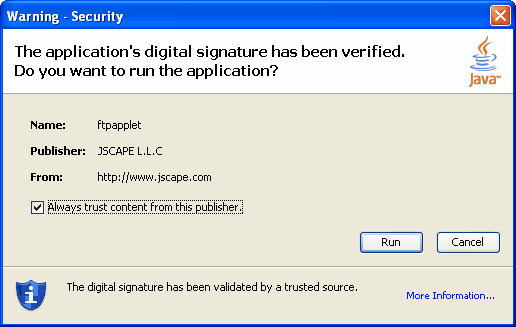
Once you have accepted the certificate dialog, the applet will continue loading.
To connect to the FTP server, click on the "Connect" button found at the lower left hand side of the user interface. The following dialog will be displayed prompting you for username and password information. Your dialog may look slightly different. Type your assigned User ID and Password and click on the "OK" button to establish a connection to the FTP server.
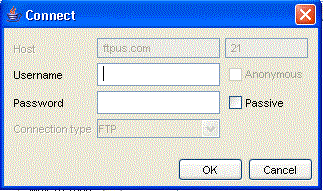
Once a connection has been established, the remote directory will be populated with the files and directories accessible on the FTP server.
Directory navigation Back
The directory listing displays your current working directory (remote or
local) along with a listing of child directories and files. Each directory
listing contains a link to it's parent directory identified by the parent folder
icon ![]() .
The parent folder icon is always the first entry shown in a directory listing
followed by child directories and then individual files.
.
The parent folder icon is always the first entry shown in a directory listing
followed by child directories and then individual files.
Each child directory is identified by the folder icon ![]() and files are identified by the file icon
and files are identified by the file icon ![]() .
To see the contents of a child directory double click on the folder icon.
.
To see the contents of a child directory double click on the folder icon.
Selecting files and directories Back
To select a file or directory click on the item in the directory listing using your mouse. You may select multiple items by holding down the SHIFT key and using your systems PGUP (page up) or PGDN (page down) keys. Alternatively you may select multiple items by holding the CTRL key and selecting each item using your mouse.
Deleting files and directories Back
To delete one or more items in a directory listing select those items that you wish to delete, right-click on the selected item(s) and select the Delete option from the popup menu or press the delete key on your keyboard. A confirmation dialog will be displayed asking you to confirm this action. Click OK to confirm or Cancel to abort this operation.

Note: A directory that contains files and or child directories may not be deleted.
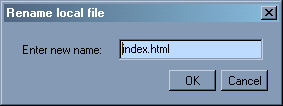
Renaming files and directories Back
To rename one or more files or directories select those items that you wish to rename, right- click on the selected item(s) and select the Rename option from the popup menu. For each item selected, a dialog will be presented with the current name highlighted. Type in the new name and click OK to confirm or Cancel to abort this operation.
Transferring files and directories Back
To transfer files and or directories, select the items you wish to transfer and check that the proper transfer mode is selected. There are two possible transfer modes (ASCII and binary). In ASCII mode any line feeds will be converted from the source system format to the destination system format. In Binary mode data is transmitted without any data conversion.
In general ASCII should be used for text files and Binary should be used for images and program executables. If you are unsure or are transferring a directory that contains both text and binary data then it is recommended that Binary transfer mode be used.
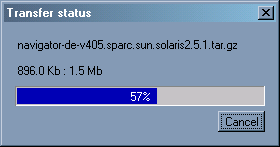
To upload selected items from your local directory listing, click on the upload button >>. To download selected items from your remote directory listing click on the download button <<. When transferring a directory the directory and its contents will be transferred recursively.
A progress dialog will be displayed indicating your transfer status. To cancel a transfer click on the "Cancel" button. This will cancel the current file being transferred as well as any other files or directories that were selected for transfer.
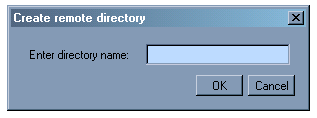
Creating a directory Back
To create a directory, right- click within the "Local System" or "Remote System" window and select the Mkdir option from the popup menu. A dialog will be displayed prompting you for the name of the directory to create. Click the OK button to create the directory or Cancel to abort this operation.
Setting transfer mode Back
The transfer mode may be controlled by toggling between the ASCII and Binary transfer mode options available in the user interface. See User interface. The default transfer mode setting is Binary.
There are two possible transfer modes (ASCII and binary). In ASCII mode any line feeds will be converted from the source system format to the destination system format. In Binary mode data is transmitted without any data conversion.
In general ASCII should be used for text files and Binary should be used for images and program executables. If you are unsure or are transferring a directory that contains both text and binary data then it is recommended that Binary transfer mode be used.
Enable Java through your Web browser Back![]()
If you already installed the Java Plug-in, but
the FTP Java applet does not work, you may need to enable Java through your Web
browser. Please follow these instructions to enable the Sun Java Plug-in though
your Web browser:
Internet Explorer 4.x and Up